
Click on one of the links below to view that part of the page
Introduction
File Management in Composer
Editing Page Properties
Editing Text Properties
The Horizontal Rule
Creating a Link
Inserting an Image
Creating Tables
Click on one of the links below to view that part of the page
Introduction
File Management in Composer
Editing Page Properties
Editing Text Properties
The Horizontal Rule
Creating a Link
Inserting an Image
Creating Tables
It has never been easy to learn all of the HTML code to develop a web page. Often enough, students and teachers do not have the time to sit down and learn the HTML tags. Luckily for those busy (and in some cases lazy) people, Netscape has developed Communicator. Communicator is a WYSIWYG (what you see is what you get) editor. Using this, one can create a basic web site in under an hour, and an advanced one in a day.
Today I am going to walk you through the steps needed to be taken in order to create a basic website using netscape composer.
To begin, you can run Netscape Composer by selecting Start
Menu, Programs, Netscape Communicator, and then Netscape
Composer.
![]()
Figure 1
Figure 1 is a section of Composer's main toolbar. This
toolbar should be the most used while in Netscape Composer. From
this toolbar you can create a new blank web page ![]() ,
open a pre-existing web page
,
open a pre-existing web page ![]() ,
save the web page you are currently working on
,
save the web page you are currently working on ![]() (note that this option should be selected as often as possible while working
on a web page), preview what the web page will look like to the viewer
(note that this option should be selected as often as possible while working
on a web page), preview what the web page will look like to the viewer ![]() ,
as well as cut, copy, and paste selections. The print icon will print the
page as it looks in Composer. If you wish to print, it is recommended that
you print from the previewed screen.
,
as well as cut, copy, and paste selections. The print icon will print the
page as it looks in Composer. If you wish to print, it is recommended that
you print from the previewed screen.
Take the File Management in Composer Quiz to
test your level of knowledge.
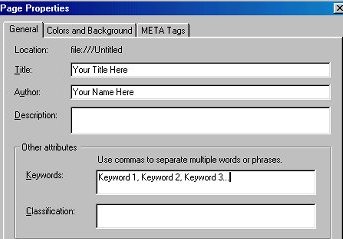 The
first thing you will want to do is give your page a title. I am doing an
informative on the Little Heiskell, the City of Hagertown's symbol. Right
click on a blank section of the page, then select page
properties, and a window like the one to the right should appear.
Make sure that you select the tab that says "General"
at the top of the window. Note the area of which you can enter a title
and an author. Here you will want to enter the title of your page and your
name,
as well as several keywords which will allow your page to be more easily
found by search engines.
The
first thing you will want to do is give your page a title. I am doing an
informative on the Little Heiskell, the City of Hagertown's symbol. Right
click on a blank section of the page, then select page
properties, and a window like the one to the right should appear.
Make sure that you select the tab that says "General"
at the top of the window. Note the area of which you can enter a title
and an author. Here you will want to enter the title of your page and your
name,
as well as several keywords which will allow your page to be more easily
found by search engines.
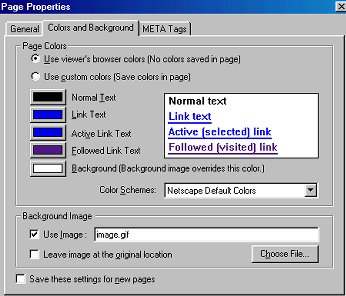 Next
you will want to set the colors of your page. To do so you will want to
right click on a blank section of the page, and then select page
properties. When the window appears select the tab that says "Colors
and Background." It should then look like the window to the left.
To edit the colors simply click on the button that contains the color you
would like to change. From there, you can select the color you wish. To
select an image to use as the background, check the box marked "Use
Image," and then click the "Choose File"
button and select the image you would like to use. Only gif and jpg files
can be used for any image on a web page.
Next
you will want to set the colors of your page. To do so you will want to
right click on a blank section of the page, and then select page
properties. When the window appears select the tab that says "Colors
and Background." It should then look like the window to the left.
To edit the colors simply click on the button that contains the color you
would like to change. From there, you can select the color you wish. To
select an image to use as the background, check the box marked "Use
Image," and then click the "Choose File"
button and select the image you would like to use. Only gif and jpg files
can be used for any image on a web page.
![]()
Figure 1a
From here you are ready to start the section of the web
page that can be viewed. To create text on a web page, all you have to
do is type what you would like the viewer to see. To align the text, click
on the text alignment icon ![]() as seen in figure 1a to, select either left, center, or right alignment.
From the text editing bar (Fig. 1a) you can make your text bold
as seen in figure 1a to, select either left, center, or right alignment.
From the text editing bar (Fig. 1a) you can make your text bold ![]() ,
italicized
,
italicized ![]() ,
and underlined
,
and underlined ![]() .
From the far left drop-down menu, you can change paragraph and heading
style (the one that says "Normal"), and the
drop-down menu to the right of that (the one that says "Variable
Width") changes font face. The drop down menu that contains the
number "14" edits
font size. The drop-down menu containing a color edits text color.
.
From the far left drop-down menu, you can change paragraph and heading
style (the one that says "Normal"), and the
drop-down menu to the right of that (the one that says "Variable
Width") changes font face. The drop down menu that contains the
number "14" edits
font size. The drop-down menu containing a color edits text color.
Using the text editing bar (Fig. 1a) you can create ordered and unordered lists. An ordered list would be a numbered list. For example:
To create a bulleted list, select the unordered list
icon ![]() .
You will see a little bullet, behind this bullet, begin typing what you
would like the viewer to see. Press enter to create another bullet. Select
the unordered list icon again to end the list.
.
You will see a little bullet, behind this bullet, begin typing what you
would like the viewer to see. Press enter to create another bullet. Select
the unordered list icon again to end the list.
The horizontal rule it a horizontal line that spans the
page (see the above line). You can insert a horizontal rule in Composer
by clicking the
H. Line button ![]() on the main toolbar. A horizontal line will be inserted where your curser
was. To edit the attributes of the line right click on it and select Horizontal
Line Properties, A window like the one below
(Fig 1.b) should appear.
on the main toolbar. A horizontal line will be inserted where your curser
was. To edit the attributes of the line right click on it and select Horizontal
Line Properties, A window like the one below
(Fig 1.b) should appear.
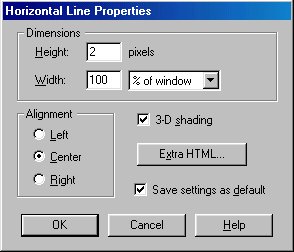
From this window you can edit the height
(thickness) of the line in pixels, and the width
(length)
of the line in either percent of window or pixels. 3-D
shading makes the line appear to be three
dimentional, whereas if it is not checked the bar will appear as a solid
color. You can align the bar to the right, left, or center.
To create a link using Netscape
Composer click on the link button ![]() on the main toolbar. The window below (figure1.c) should appear upon clicking
the link button.
on the main toolbar. The window below (figure1.c) should appear upon clicking
the link button.
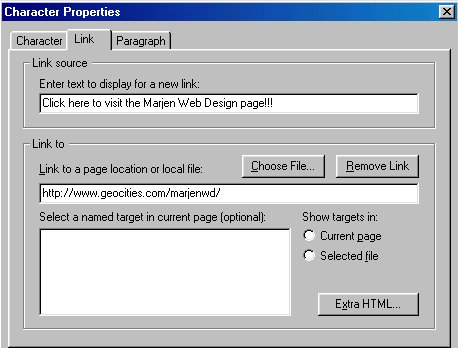
Creating a link is quite simple. First you will want to
decide what you would like the viewer to see (in other words the text that
the viewer will click on to be routed to the URL you desire). Insert that
text in the box underneath "Enter text to display
for a new link:." Now simply insert the URL
that you would like to link to into the box beneath "Link
to a page location or local file:." Now click
OK
and
your ready to go.
If you wish to make an image link
to a page, and not text, view my clickable images
section of the page.
A large part of a web page is its graphics. Graphics can
either enhance a web page, or cripple it. A graphic should be attractive,
but needs to be limited in file size to eliminate extensive download time.
To insert an image using Composer, click on the image button ![]() on the main toolbar, the image below (figure 2.a) is the window that will
appear.
on the main toolbar, the image below (figure 2.a) is the window that will
appear.
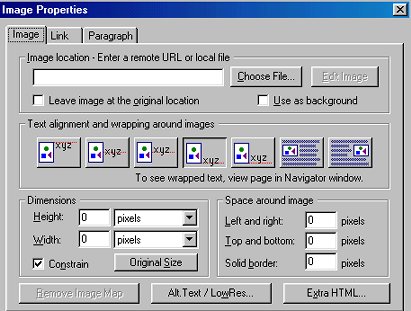
Figure 2.a
 Make
sure the image tab has
been selected. To choose the image you would like to insert, click
on the choose file button
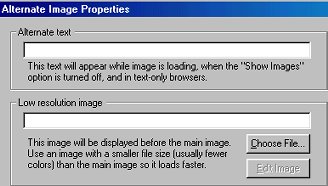
and find the image to insert. Next you will want to add the alt text, alt
text is short for alternate text, it is the writing that pops up when an
image is moused over and the words that are seen if an image is unviewable
or the viewer is using Lynx (a text based browser). To insert the alt text
click on the Alt. Text/LowRes... button,
and the window to the right should appear. Type in the box below the writing
Alternate Text what you would like your alternate text
to read. If you would like you may insert a low resolution image from this
window. To do this you must have another image with a lower resolution.
The lower resolution image with a smaller file size will download first
and the the actual image causing the optical illusion that it is downloading
faster.
Make
sure the image tab has
been selected. To choose the image you would like to insert, click
on the choose file button
and find the image to insert. Next you will want to add the alt text, alt
text is short for alternate text, it is the writing that pops up when an
image is moused over and the words that are seen if an image is unviewable
or the viewer is using Lynx (a text based browser). To insert the alt text
click on the Alt. Text/LowRes... button,
and the window to the right should appear. Type in the box below the writing
Alternate Text what you would like your alternate text
to read. If you would like you may insert a low resolution image from this
window. To do this you must have another image with a lower resolution.
The lower resolution image with a smaller file size will download first
and the the actual image causing the optical illusion that it is downloading
faster.
From Image
Properties (Fig. 2.a) window you can select
the alignment of the images. To align the image to the left, makes all
text wrap around the right side of the image, click the left align button ![]() .
To align an image to the right, click the right align button
.
To align an image to the right, click the right align button ![]() .
When the image appears in Composer you will not see the text wrap around
the image, instead you will need to type it following the image, and when
it is previewed you will see that it has been wrapped around the image.
Follow this link for a visual example of how it
will look in Composer, and then in the preview window.
.
When the image appears in Composer you will not see the text wrap around
the image, instead you will need to type it following the image, and when
it is previewed you will see that it has been wrapped around the image.
Follow this link for a visual example of how it
will look in Composer, and then in the preview window.
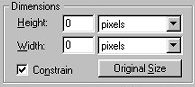
From the Image
Properties (Fig. 2.a) window, you can also
define the dimensions of an image. If you
leave both the height and width
values at 0 the image will appear as its original size. However, if you
 would
like to make the image a specific size (in pixels or percentage of window)
simply define the values. The image to the left is where you would insert
the values. Notice that in this example height and width are set at 0,
leaving the image its original size (note: when the settings are 0, the
image appears extremely small in Composer, it appears its original size
in the browser). Remember that when you insert an image, composer will automatically
insert the size of the image.
would
like to make the image a specific size (in pixels or percentage of window)
simply define the values. The image to the left is where you would insert
the values. Notice that in this example height and width are set at 0,
leaving the image its original size (note: when the settings are 0, the
image appears extremely small in Composer, it appears its original size
in the browser). Remember that when you insert an image, composer will automatically
insert the size of the image.
As you can see in Figure 2.a, you can manipulate the spacing
around an image. All spacing is done in
pixels, not percent of window or percent of image. Left
and right spacing adds blank space on both the
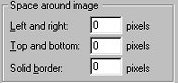 left and the right side of the image. Top and bottom
does the exact same as left and right except
that it adds space to the top an bottom. Solid border
will create spacing around all sides of the image. Keep in mind that if
have a value in for solid border, and the
image is a clickable link, a border with the same pixel size as inserted
in the Solid border box and the same color as your pages link color, will
appear around your image. If you have a border around a clickable image
that you would like to remove, simple insert 0 into the solid
border box.
left and the right side of the image. Top and bottom
does the exact same as left and right except
that it adds space to the top an bottom. Solid border
will create spacing around all sides of the image. Keep in mind that if
have a value in for solid border, and the
image is a clickable link, a border with the same pixel size as inserted
in the Solid border box and the same color as your pages link color, will
appear around your image. If you have a border around a clickable image
that you would like to remove, simple insert 0 into the solid
border box.
To
make an image clickable (linking to another page), right click on the image
and select "Create link using selected..."
and the Character Properties window
(figure 1.c) should pop up. In this window insert the URL of the page you
would like to link to into the box underneath "Link
to a page location or selected file." Click
OK
and
your done.
Back to the Creating a link
section of the page if you clicked on that link to come here.
To insert a table in Netscape Composer you will first
want to have the curser at the position you would like the table to be
inserted. Next, click on the table button ![]() on the main toolbar and the window below (figure 3.a) should appear.
on the main toolbar and the window below (figure 3.a) should appear.
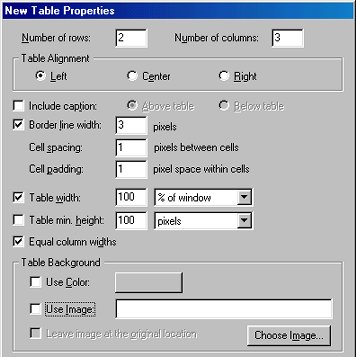
The first thing you will want to do will be decide how many columns and rows you would like the table to contain and insert the values. In this case here the table will have 2 rows and 3 columns. Next you will want to set the alignment of the table (this is where the table will appear on the web page). You can align the table to the left, center, or right. In this example (figure 3.a) the table is aligned to the left, however, in most cases the table will be centered.
At this point you can decide whether or not you would like to insert a caption with your table. To insert a caption check the white box to the left of the words "Include caption", and then select whether you would like it above the table or below the table. You do not insert the text for the caption until you exit this window. You will see an area marked off by a box surrounded by dashed lines, either above the table or below it depending on where you decided to put it, in this box you can insert the text you desire. In the example above (figure 3.a) I did not include a caption.
In this window you can edit different attributes that effect the size, spacing, and borders of the table. To edit the width of the table border, edit the value in pixels in the box to the right of "Border line width" that you wish the table border to be. To have no table border just insert 0 in the box. Cell spacing and Cell Padding effect the amout of space, in pixels, between the cells and within the cells.
To edit the table width and height to a specific size, you will need to check the boxes to the left of "Table width" and "Table min. height." If the tables are not checked, then the table will be just large enough to surround what it is you have inserted into it. You can edit the attributes in either Percent of window or pixels.
From the table properties window (figure 3.a), you can choose either a color or an image as the background of the table.
George Cassutto's Cyberlearning World: http://www.cyberlearning-world.com
[Lesson Plan of the Day]
[Cassutto Memorial] [About
the Author] [Search]
[Civics
Lesson Plans]