One can do a search using any of the major search engines using the terms "HTML Tutorial" in order to gain a huge list of HTML lessons on the web. One such lesson can be found at http://www.angelfire.com/doc/basics.html. This site contains a list of often-used HTML tags. To view other great HTML web sites, visit my organized bookmarks and look for HTML tutorials, especially the HTML Tutorials page by John C. Gilson.
HTML editors can be divided into two flavors: code-based editors, and WYSIWYG editors. WYSIWYG stands for "what you see is what you get" and the term applies to these editors because as one moves the elements around the screen, the page is being developed pretty much as it will appear on the page itself. These editors require little or no knowledge of HTML code. The code is automatically generated as the designer activates the buttons and dialogue boxes of the program. One can still alter the program-generated code by using a code based or regular text-based editor. Two of the most effective and popular WYSIWYG page editors are Netscape's Composer and Microsoft's Frontpage.
Code-based editors require a reasonably commanding knowledge of HTML. These editors simplify the tasks of adding links, images, manipulating page layout elements, and previewing the page in the browser, but one must still be able to analyze and correct the code that results from pointing and clicking within the editor. One of the most effective code-based editors is Brooklyn North's HTML Assisant Pro. This editor was available as freeware (HTML Assistant Pro Free 3), but now only the shareware version is availbale from its web site. After thirty days, get ready to shell out $89.95. Composer is free with your download of Netscape Communicator. Microsoft Frontpage sells for about $200. But a "lite" version of it is available for free with a free download of Microsoft's Internet Explorer 4.0.
While WYSIWYG editors are great time savers, they often fail to achieve the effect desired by the web page designer. It is important, therefore, for the designer to be able to manipulate the code after it has been generated by the editor. Microsoft Frontpage is the strongest editor inthis area because it allows the designer to easily move between WYSIWYG and code-based modes. Once the code has been corrected or manipulated, the designer can move back to a non-code mode, which allows for both time-saving and control. Composer requires the designer to go to an external editor such as notepad or HTML Assistant to manipulate the code of the page being worked on.
Which editor is the best? That depends on what task one is working on at the time. Composer and Frontpage have great tables editors. Frontpage allows for the easy development of frames. Notepad and PICO (used with telnet while dialing to a designer's Unix Shell) are great editors for quick, brief non-code-based corrections. HTML Assistant is excellent for adding links and graphics without having the editor rewrite one's code by accident (Composer is notrious for this). It all depends of what the designer is trying to achieve at that moment in the least amount of time.
![]()
One way to save much HTML coding time is to develop a simple template into which web content can be inserted by way of text-editor or HTML editor. The template will contain the basic HTML tags of any simple HTML document. The busy webmaster, be s/he stude nt or teacher, can just bring up the template, and when the document is done, it should be saved under another title so as to not overwrite the original. Here is what a template might look like using HTML Assistant:
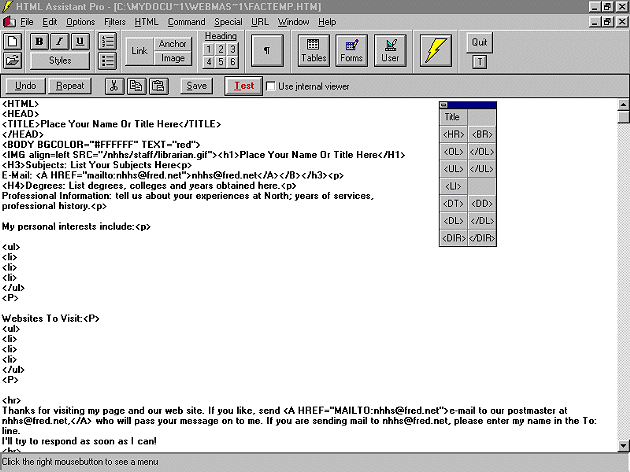 |
This screen shot illustrates many of the basic HTML tags one needs to know to code simple web pages.
In the various trainings I have designed, I have used two rudimentary web page templates. These are avilable to you here. Just click on the link, load the page, hit the file menu in your browser and save the file to your hard drive. The file will need to be renamed when you save it after editing so that your template remains untouched. Use your favorite editor to make the needed changes. Be sure to delete any "dummy information" and add in your own data.
![]()

One way to see how it's all set up is to look at the HTML that makes up the pages of the web itself while viewing them, which can be done by using Netscape's View Source feature. With it, you can see the URLs that point to the other pages, the tags that give a page that special flare, and the filenames of graphics that have b een used. One can also use the Windows commands "copy" (control-C) and "paste" (control-V) from the source document being viewed to cut and paste elements from the Web itself directly to the text- or HTML editor. So the next time you spot a table or effec t that you like, you can go to View, Source, cut and paste that HTML text into the document you are working on. LYNX also allows you to view the source HTML with the \ command. Internet Explorer also allows one to see HTML source code by clicking on "view," then "source." Notepad with open with the code contained within.
If you have Microsoft's Powerpoint, you can download this quick classroom-based tutorial on Developing Web Pages With HTML Assistant.
If you have installed the plug-in for Powerpoint Animations (Win 95 only), you can view this presentation right in your own browser.
![]()
Your school's website would be quite limited if it did not consist of a number of pages on different topics and links to other sites that might interest the reader. One can link pages to other pages within the site or to documents existing on computers a all over the world. As seen below, one can create a link by using the URL of the target document and placing it within an HTML command that looks like this:
<a href="http://www.someplace.com/filename.htm">The name of the document</a>
This series of tags tells the browser to look for a document on the WWW server of someplace.com. The "a" stands for anchor, the "h" for hypertext, and the ref is for reference. The </a> tells the browser to end the hypertext link.
To set up a link within one's own website, a partial URL is all that is needed: <a href="/directory/subdirectory/filename.htm>filename
or even <"filename.htm"> if the file is in the same directory as the HTML file being edited.
[Lesson Plan of the Day] [Cassutto Memorial] [About the Author] [Search] [Civics Lesson Plans]
|